
Thursday, July 28, 2011
Blogger Link up Party!
Looking for new blogger friends? Candace over at Scrappin'2Princesses is having a linkup party. Hop on over and check out her blog, it's cute and there are a lot of bloggers linking up so you can go check them out too!

Wednesday, July 27, 2011
Peachy Keen Stamps :: Sketch Challenge 57 w/a Twist!
Hey everyone! I'm back already with my newest addiction...Peachy Keen Stamps! This time it is a sketch challenge. You can check out their challenge page on the Peachy Keen blog if you want to be challenged yourself!
Here is the challenge, copied from the blog...


Here is the challenge, copied from the blog...


- Create a card based on the layout provided (Peachy Keen Stamps are not required for this challenge, but if you've got them, we looooove seeing how you create with them!)
- Project must include basic elements from the sketch, and color combo!
Not too hard, so I decided to keep it simple. Here is what I came up with...

I cut the card 4 x 6 to begin with. Now the really fun part. I used a free program that I downloaded from the internet to get the EXACT colors from the color swatch above. It is called "Color Cop," a free multipurpose color picker. Someone on the Cricut Message Board told us about it (not sure who the original poster was that mentioned it, and I won't go into the little tiff that broke out over "who was the first to mention it"...crazy!) Any whoo...after you download this neat little program, you open it and take the little eye dropper and hover over the color swatch and it tells you the exact RGB code of the color and you enter it in your Imagine and TADA!!! you print and cut with the exact colors! This makes me giddy it is so cool :)
To enter the RGB (red, green, blue) numbers you click on the image, then the little edit pencil and then in the color palette below the image there is a square with a rainbow and a down arrow, click it and you will see the place at the bottom to enter the codes. IT IS SO COOOOOL! This is a HUGE reason I love my Imagine. The card above was made with white cardstock.

And of course I had to stamp on a cute little Peachy Keen face. The two large volleyballs were cut from Sports Mania at 1.5" and the three small ones were cut at 1.2". I cut the "I dig" from the same cartridge at 1" and then I inked all the edges, because that's the way I roll! :D
Now for the volleyball net in the background. I had this cool stuff in my stash for ages. It is called Magic Mesh and I don't know if you can even get it anymore. I got it from Leaving Prints, a direct sales scrapbook company I used to work for which no longer exists :(. It is sticky on one side and I inked the non-sticky side to make it black-ish because it was white. Then I just cut 1/4" strips for the tape across the top and bottom.

On the inside I cut the "YOU" using the Varsity Letters Lite cartridge from Walmart and cut them at 1 1/2". I really like the way it turned out and I hope you do also.
Stop by Peachy Keen Stamps blog and join in on the challenge fun! It will get your creative juices flowing. Now I am off to link my project on the challenge blog. Have a blessed day!
~Jana
Monday, July 25, 2011
Oh Barn! Peachy Keen Face It Friday Challenge
Well, I didn't make the design team I submitted a layout for, but I sure enjoyed creating the layout and the suspense of waiting to find out who made it. There are a TON of talented crafters out there but I am going to keep at it and work on improving my skills!
Sooooo, as some of you know, Peachy Keen Stamps has some of the CUTEST face stamps ever and I haven't been using mine much so I decided to take part in their Face it Friday challenge, which I have never done before. I must also mention this card was made for my dad, because I got his birthday mixed up with my nephew's and forgot to tell him happy birthday. Maybe this will cheer him up. It makes me smile when I look at it!
The challenge was to use a Peachy Keen stamp and also a pun. I had seen this pun somewhere before but I have no idea where. I just got Country Life cartridge and loved the barn on it so I used it for this card.

I like to make my cards on 8 1/2 x 11" cardstock folded in half. It gives me lots of design room. I used Everyday Paper Dolls and cut the farmer at 4" along with his pitch fork and animals. I used the Peachy Keen stamp from the PK 490-Everyday Character Face Assortment. There are just so many uses for this set.
I just drew on the face for the pig and the chicken, then quickly went to Peachykeenstamps.com and purchased the Critter faces set :)
I love the innocent shocked look on his face! I used my Copics to do all the coloring, drawing in his hair (I didn't like the cut for the hair) and also to add highlights and colored the band on his hat. I used Peacock Liquid Pearls for his overall buttons and a white Gellyroll pen for the dots and details.


The barn was cut at 3.5" from the Country Life cartridge and filled with my Imagine cartridge Country Carnival but all the other colors and patterns come from the Imagine Hopscotch cartridge. I just love being able to create something so fun with nothing but white paper!

The title was cut with the rope font from the Old West cartridge and filled in with a pattern from Country Carnival also, then I went in with my E57 Copic and went over the rope cuts so they would show up better. These letters were cut at .6" on the Imagine.

When I created the hills and grass in the background, I cut two rectangles at 5 x 7 and filled then with patterns from Hopscotch then cut them and pieced them into the background. I had some small strips left over so I used one to put on the inside of the card. I found this free rope font from Fontspace.com which took me a total of about 3 minutes to find, download and install. So easy!
So, wish me luck on the challenge and my sweet daddy a happy birthday! Thanks for stopping by!
Blessings,
jana
Sunday, July 17, 2011
Layout for Design Team Call
OOOooo!!! I am so nervous! This will be the first time I have tried out for ANYTHING in regards to paper crafting. I'm trying not to get my hopes up too high because the competition is very strong but I'm giving it my best try.
The design team I am trying out for is for the blog Creative Critterz Imagination. The focus of their blog is crafting with the Cricut Imagine, which is the machine I LOVE!!!! So I thought this would be perfect.
Anyway, here is what I came up with for the challenge. I wanted to really see what I could do with the Lori's Garden cartridge and I am pretty pleased with the result. Although it is a 12 x 12 layout, I think I will be mounting it on canvas and using it as home decor. Not decided yet though.
 I wanted to try and show the full potential of Lori's Garden but I found it impossible because the cartridge has so much to offer so I went with the flowers and mushrooms that were on it. The frame was cut from the Cindy Loo cartridge using the fit to page feature and filled with the large pink rose pattern from Lori's Garden. The mat and photo mat was cut using the 3:5 built in rectangle cut at 5" and then at 4.7" but that didn't fit quite right so I cut them down by an inch on one short side of each rectangle then used my Creative Memories corner rounder to round the corners.
I created the entire layout with white textured card stock (Colorbok, from Walmart), pop dots and brown ink. I think I used like 3 full pieces of paper and then scraps for the rest of the cuts.
 The trio of mushrooms were cut at 2.5" and cut with all the layers. Behind the mushrooms I placed one of the icons included in the cartridge and it was cut at 4.0". I think it gives the floral scene a little depth.
 The rose arrangement at the top left of this photo was cut at 3.5" and layered, then I let the spray of flowers on each side of it kind of wind through the other flowers as I placed them. The blue flowers were cut at 2.5" and 2.0".
 I LOVE this butterfly! It is so pretty and has many layers with it. I found that all the layers did not need the antennae so I trimmed them all off but the bottom layer. I also did not add the tiny tiny little gray strip layer on the body, I found it unnecessary. It may have worked for a larger cut though. This one is cut at 2.5". The blue flower flourish with the butterfly is cut at 3.5" using all layers also. Love the layers!!!
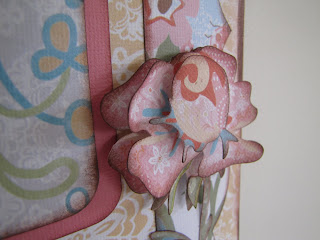 I just couldn't leave out the long stemmed rose with its many layers. Lori's Garden gives you plenty of layers to create a full 3D effect on all of its images. I don't always use pop dots under every layer because it can get way to tall and look funny, so some of the layers I just curled up the petals and glued the center down. This card stock is nice and heavy so they stay curled nicely.
 The two pink pansies were cut at 2.5" and 2.0 and included in the arrangement on each bottom corner. It was also fun to kind of weave the mushroom icon through the arrangement also.
 The tiny yellow and pink butterfly actually was cut from the mushroom icon but was separate so I put it gently landing on the blue flower and popped up its wings. As you probably noticed, I inked ALL the edges with brown ink. For tiny curves and curls and the insides of cuts I use a scruffy brush with really short and stiff bristles and dip it into my ink pad and ink the edges that way. The ink gives all the cuts definition, hides when my calibration is a little off and gives depth and a distressed look. The colors and patterns in Lori's Garden are so soft that with out the inking, they all blend together and fall flat.
Thanks for stopping by, wish me luck and maybe the next time you visit you will see a challenge I am creating for the design team. Who knows??? Right???
Blessings,
Jana
The design team I am trying out for is for the blog Creative Critterz Imagination. The focus of their blog is crafting with the Cricut Imagine, which is the machine I LOVE!!!! So I thought this would be perfect.
Anyway, here is what I came up with for the challenge. I wanted to really see what I could do with the Lori's Garden cartridge and I am pretty pleased with the result. Although it is a 12 x 12 layout, I think I will be mounting it on canvas and using it as home decor. Not decided yet though.

I created the entire layout with white textured card stock (Colorbok, from Walmart), pop dots and brown ink. I think I used like 3 full pieces of paper and then scraps for the rest of the cuts.


Thanks for stopping by, wish me luck and maybe the next time you visit you will see a challenge I am creating for the design team. Who knows??? Right???
Blessings,
Jana
Friday, July 15, 2011
Six Flags Fun Layout
When I was at the Great American Scrapbook Convention in Arlington, TX in early June I purchased a cute layout kit of an amusement park for our trip to Six Flags. It had a detailed roller coaster on it. When I got it out to put together I had a bit of a panic attack because I usually create a duplicate layout so that I have two for each of my daughter's scrapbooks and this roller coaster was going to be WAY too hard to trace and cut out. Soooo...I went to www.mycutsearch.com and did a search for a roller coaster and found one on the Summer Vacation solutions cartridge that was perfect! I think this layout turned out better than the kit!

I love the way it turned out, don't you??? So, if I remember right, I cut the roller coaster at about 4" but I have to admit, I sized it up on my Imagine until it was as wide as I could get it without it turning into a grey rectangle because it was too large for the mat :) So 4" is a guestimation. I cut it once and then cut it the second time with the "flip" feature turned on.


Just LOOK at the detail! The Imagine cuts with incredible precision on intricate cuts. LOOOOOVE my Imagine!!! I used the small square pop dots and cut then in half so I could pop up the coaster for added dimension. I am a bit of a pop dot nut :)

All of the papers and the big font came from the "Blast Off" Imagine cartridge. I even flood filled the coaster with a paper from this cartridge. It is one of my favorites because it has such fun and bright colors. Funny thing happened though. If you have the Blast Off cartridge you won't find the light blue paper that is behind the roller coaster, why you ask???? At least I pretended you did :) Well, what happened was serendipitous, my Imagine color ink cartridge ran out of yellow ink when I tried to print the green paper (like in the top of the layout) and it became this great blue, with all the details! So instead of chunking it, I decided to use it. I really like the way it turned out and I didn't feel like I had wasted paper or ink on the blue paper.
I was at a weekend retreat when I made this layout and every time I went to print and cut it told me "low ink" and I got that message for two straight days of scrapbooking before it ran out of the yellow and I had to change the color cartridge. Pretty good in my opinion!
Hope you enjoyed my layout, thanks for stopping by!
Blessings,
jana
Sunday, July 10, 2011
Blog Awards!
Wow! Was I surprised to get two sweet notes in my email box a few days ago directing me to two wonderful ladies blogs that bestowed upon me my first two blog awards. No how fun is that, never had an award and now I have two in one day! I hope you will stop by and visit these ladies, their links are below the award they gave me. I feel honored to received them. Only a few months ago, I was wondering if I would ever even have a visitor to my blog. "Am I writing this for any reason other than my own entertainment? Or will people really read it?" Well the awards tell me that there are really people out there stopping by but I still believe it is a bit for my own entertainment :) Stop by later tonight and I will post one of my new projects.


The "Stinkin Cute" award came from Raina at scrapwithraina.blogspot.com. She has a great blog and I love her devotionals that she posts. To receive this award I was asked to post 7 things about myself and then pay it forward to 7 other bloggers to receive this award also. So here goes:
7 Things about me:
1. Jesus is my one and only Savior
2. I am blessed with a wonderful husband of 22 years
3. I have been blessed with 2 beautiful daughters
4. I am an artist and art educator
5. I love to work out (I get high from God's love and running:)
6. I live in the country and LOVE it!
7. I have been scrapbooking and quilting for about 10 years and making cards for about 4 months.
So the "Stinkin' Cute" awards go to: (please stop by and visit them. They might not all be crafters/artists, but they bless me with their wonderful writing)
1. Christie @ http://paintsandpistols.blogspot.com
2. Mommy @ http://www.creationsbymommy.com
3. Kahaulani @ http://creationsby-kahaulani.blogspot.com
4. Wendy @ http://gilbyscraftster.blogspot.com
5. Mary @ http://maryscraftingspot.blogspot.com
6. Tammy @ http://theeventqueen.blogspot.com
7. Roberta @ http://txscrappermom.blogspot.com
This blog award came from Linda over at ladybuglair.blogspot.com. She is a friend from the Cricut Message board and she has a great blog. The rules for her award were the same. Thank the awarder, lsit 7 things about yourself (not listing them again) and then award it to seven other bloggers. So I am awarding the following bloggers the "Irresistibly Sweet" award:
1. Molly @ http://molly-mollyb.blogspot.com/
2. Karel @ http://www.kareljcreations.com/
3. Tamara @ http://nestingpretty.blogspot.com/
4. Paula @ http://morethanfavors.blogspot.com/
5. Tiffany @ http://mysweetlemonadedreams.blogspot.com/
6. Mary @ http://marebearscraps.blogspot.com/
7. Ally @ http://allyrosedesigns.blogspot.com/
I hope you will stop by and visit these blogs. They are inspiration for me when I really need it. Some are long time bloggers and some are newbies but all are fun, energetic and inspirational! Tell them I said HI!
blessings,
Jana
Tuesday, July 5, 2011
Oh to Be 13...
Ok, so this is one of my favorite layout kits EVER!!! A big shout out to Monique Griffith!! Woop woop!!! Sorry, I know...a little carried away but this kit was so fun to put together. Sometimes when I am not feeling very creative I pull out a page kit that I have purchased either online or at the Great American Scrapbook Convention. Page kits are one of the reasons I LOVE to go to convention. You get to see them in person to be able to check out the quality and even meet the inspiring person that designed them.
Today I am sharing with you a kit that I bought online after it was posted on the Cricut.com message board by Monique herself. This woman is talented and better yet, she uses the Cricut in her kits. Love it!!! You can find her fabulous kits at www.MoniqueGriffithDesigns.com.
On to the layout. It was fun using pictures that my daughter and her friends had taken with their iPods and then altered in their "CamWow" app. I thought they fit the layout well. I wouldn't call my daughter a "tough girl" but she likes to pretend...don't all 13 year olds. :)
 As you can see, there are 9 different images used from the Rock Princess Cricut cartridge. That comes up to 63 different cuts! (14 of them were the little stars) Don't panic though, Monique makes it much easier by listing them on a cutting chart by color. So all the cuts from white paper were listed first, all black cuts listed etc. She gives the page number from the handbook, blade depth and pressure if you need it. She also gives the size. I made it even easier and arranged all my cuts in my Gypsy, so I only had to send it to cut about 7 times because I would arrange up to 3 colors of papers on my mat and the matching cuts on the Gypsy screen and then send them all to cut at once. With out the Gypsy, I could see this layout taking DAYS! I used the regular Gypsy app but cut it with my Imagine!
 I popped the images up with pop dots and inked all the edges with black Color Box pigment brush pad and Monique suggested using a silver Gelly Roll pen to add the dot accents all over the page and it really added great detail to the overall layout.
 I just loved this girl. She is the reason I bought the kit. Doesn't she just look so smooth and cool? Oh and the girl in the pic is pretty cool too, right? hehe!


 The crown was fun too. I added the silver gel dots and then used my Glossy Accents by Inkssentials to give it a little more shine and then dotted them again with the silver after it dried.
 This project was tedious but fun. Sometimes I like a challenge. It wasn't hard by any means though, just plain fun, but then again I like really hard puzzles too :)
I also learned that my daughters goofy iPod pictures are actually pretty cool sometimes. So after I finished this layout, I plugged her iPod into my computer and "borrowed" some more fun pics that I will post in my next favorite page kit. That will come a little later this week.
Thanks for stopping by!
Blessings,
Jana
Today I am sharing with you a kit that I bought online after it was posted on the Cricut.com message board by Monique herself. This woman is talented and better yet, she uses the Cricut in her kits. Love it!!! You can find her fabulous kits at www.MoniqueGriffithDesigns.com.
On to the layout. It was fun using pictures that my daughter and her friends had taken with their iPods and then altered in their "CamWow" app. I thought they fit the layout well. I wouldn't call my daughter a "tough girl" but she likes to pretend...don't all 13 year olds. :)


I also learned that my daughters goofy iPod pictures are actually pretty cool sometimes. So after I finished this layout, I plugged her iPod into my computer and "borrowed" some more fun pics that I will post in my next favorite page kit. That will come a little later this week.
Thanks for stopping by!
Blessings,
Jana
Subscribe to:
Posts (Atom)